
How to Remove Rust from Metal Railing?
Rust is one of the most common and destructive problems metal railings face, particularly in coastal, humid, or high-traffic environments. Whether you are dealing with a garden fence post, an outdoor staircase rail, or an architectural railing system, rust left untreated will compromise both aesthetics and structural integrity.
At Vionta Metal, we have spent years working alongside architects, contractors, and homeowners to engineer railings that resist corrosion and stand the test of time. This guide draws on our deep manufacturing expertise to walk you through every stage of rust removal, material selection, and long-term prevention so that your railing investment truly lasts.
Table of Contents
- What Causes Rust on Metal Railings and Why Does It Matter?
- What Tools and Materials Do You Need Before Starting?
- How Do You Remove Rust from Metal Railing Step by Step?
- How Does Rust Removal Differ Between Stainless Steel Railing and Aluminum Railing?
- What Are the Best Rust Removal Products and When Should You Use Each?
- How Do You Prevent Rust from Coming Back After Treatment?
- What Does Vionta Metal Recommend for Long-Term Railing Maintenance?
- Conclusion
What Causes Rust on Metal Railings and Why Does It Matter?
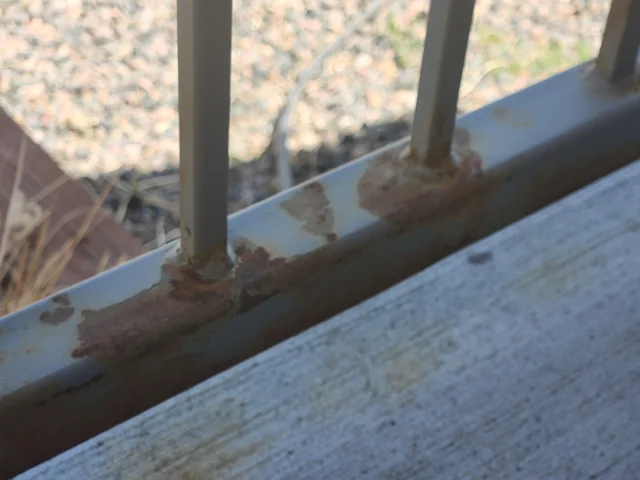
To fundamentally solve the problem of rust, the first step is to understand how it occurs. Simply put, rusting is a process called "oxidation"—when iron or steel is exposed to air and moisture over time, it gradually reacts, forming the reddish-brown rust we observe.
This process is actually not complicated: iron in the metal reacts with oxygen in the air and gradually transforms into iron oxide with the involvement of moisture. Over time, these rust layers continue to expand and flake off, making the metal surface rough and even eroding layer by layer inward, weakening the structure accordingly.
Primary Causes of Rust on Metal Railings
- Prolonged exposure to rain, dew, and high relative humidity above 60 percent
- Salt air in coastal or waterfront environments, which dramatically accelerates oxidation
- Physical damage such as scratches, chips, or dents that expose bare metal beneath a protective coating
- Galvanic corrosion that occurs when dissimilar metals come into direct contact in the presence of an electrolyte like rainwater
- Low-quality or incorrectly applied surface coatings that fail to provide a continuous moisture barrier
- Pooling water at joints, welds, and post bases where drainage is poor
- Industrial pollutants, acidic rain, and chemical splashes that degrade protective layers
- Neglected maintenance schedules that allow minor surface oxidation to deepen before treatment
Why Rust Is More Than a Cosmetic Problem
Many homeowners view rust merely as a visual inconvenience. In reality, allowing rust to develop poses a structural threat. As iron oxides expand, they create internal stress, leading to cracking or delamination of the metal. Welds are the first to be affected, as they are often the weakest and least protected areas. Column bases embedded in concrete can rust below the surface, only becoming apparent when the railing physically wobbles or fails. Our factory has analyzed hundreds of railing failure cases submitted by clients, the majority stemming from minute rust spots that have been ignored for more than two seasons.
Early intervention is always more cost-effective than replacement. Addressing surface rust while it's still shallow means you can repair the handrail within a day using only basic tools. Allowing rust to penetrate deeper into the metal cross-section may require cutting and replacing the entire component, significantly increasing costs. The good news is that with the right knowledge, removing rust from metal railings is a manageable task for most property owners and maintenance professionals.
| Rust Stage | Visual Appearance | Depth of Penetration | Recommended Action | Estimated Repair Time |
| Stage 1: Surface Bloom | Light orange tint or staining | Less than 0.1 mm | Clean with rust remover and re-seal | 1 to 2 hours |
| Stage 2: Moderate Rust | Visible reddish-brown patches | 0.1 to 0.5 mm | Mechanical abrasion plus chemical treatment | Half day |
| Stage 3: Deep Corrosion | Pitting, flaking, and scaling | 0.5 to 2 mm | Aggressive removal, filler, prime, and repaint | Full day or more |
| Stage 4: Structural Damage | Holes, severe deformation | Through the wall thickness | Section replacement by a qualified fabricator | Professional assessment required |
What Tools and Materials Do You Need Before Starting?
Preparation is half the battle. Rushing into rust removal without the right equipment leads to incomplete results, potential personal injury, and surface damage that makes future maintenance harder. Our team at Vionta Metal always emphasizes that the quality of your tools directly impacts the quality of your outcome. Spending an extra twenty minutes gathering everything before you begin saves hours of rework.
The tools and materials you need depend on the severity of the rust and the type of metal you are working with. Below we break down the complete supply list by category so you can shop or gather everything in one go before starting the job.
Personal Protective Equipment
- Safety goggles or a full face shield to protect eyes from metal particles, rust dust, and chemical splashes
- Chemical-resistant nitrile gloves, especially when working with phosphoric acid or oxalic acid-based rust removers
- An N95 or higher-rated dust respirator mask when sanding or using a wire brush, since rust particles are a health hazard when inhaled
- Long-sleeved clothing and closed-toe shoes to protect skin from both mechanical abrasion and chemical contact
- Hearing protection if using power tools for extended periods
Mechanical Abrasion Tools
- Wire brush set: both stiff steel-bristle hand brushes and softer brass brushes for delicate or coated surfaces
- Angle grinder fitted with a wire wheel attachment or flap disc for medium to heavy rust on thicker railing sections
- Orbital sander with 60 to 120 grit sandpaper for smoothing surfaces after rust removal
- Fine-grit sandpaper (180 to 320 grit) for surface finishing before primer application
- Needle scaler for textured or welded joints where conventional brushes cannot reach
- Dental pick or similar pointed tool for clearing rust from inside bolt holes, screw channels, and ornate details
Chemical Treatment Supplies
- Phosphoric acid-based rust converter or remover (most versatile and widely recommended)
- Naval jelly for vertical and overhead applications where liquid products would run off
- White vinegar or citric acid solution for a milder, environment-friendly option on light surface rust
- Oxalic acid solution for stubborn rust staining on stainless steel railing and polished surfaces
- Mineral spirits or acetone for degreasing the surface before chemical treatment
- Clean rags and shop towels in quantity
- Plastic sheeting and painter's tape to protect surrounding areas from chemical overspray
Finishing and Protection Supplies
- Rust-inhibiting metal primer compatible with your chosen topcoat system
- High-quality exterior metal paint, powder coating touch-up, or a clear protective sealant
- Paint brushes, foam rollers, or a spray gun depending on the scale and complexity of the railing
- Wax or paste compound for polished stainless steel railing sections that do not require painting
- Waterproof silicone caulk for sealing gaps at post bases and transitions
Professional Tip from our factory floor: Always buy slightly more sandpaper, wire brush wheels, and chemical remover than you think you will need. Running out of abrasives halfway through the job and leaving bare metal exposed overnight can cause flash rust to form within hours, undoing your progress entirely.
| Tool or Material | Primary Use | Best For | Approximate Cost Range (USD) |
| Wire Hand Brush | Scrubbing loose rust by hand | Light rust, small areas | 3 to 12 |
| Angle Grinder with Wire Wheel | Heavy mechanical rust removal | Moderate to heavy rust, large areas | 40 to 180 (tool), 5 to 20 (wheel) |
| Phosphoric Acid Rust Remover | Converting rust to iron phosphate | All rust stages, most metals | 12 to 35 per liter |
| Naval Jelly | Clinging gel for vertical surfaces | Curved, vertical, or overhead sections | 8 to 20 per tube |
| Oxalic Acid Solution | Removing rust stains from polished surfaces | Stainless steel railing, polished aluminum | 10 to 25 |
| Rust-Inhibiting Primer | Preventing future oxidation after cleaning | All painted metal railings | 15 to 45 per liter |
| Fine-Grit Sandpaper Pack | Surface prep and finishing | All metals before topcoat application | 5 to 18 per pack |
| Nitrile Gloves (box) | Hand protection from chemicals | All chemical applications | 8 to 22 per box of 100 |
How Do You Remove Rust from Metal Railing Step by Step?
The step-by-step process we outline below is built from our production and quality control experience at Vionta Metal, refined through thousands of railing installations and client maintenance consultations. Following this sequence precisely ensures you remove all active rust, treat the metal to neutralize residual oxidation, and apply a protective finish that will last for years rather than months.
Before beginning any work, assess the full extent of the rust. Walk the entire length of the railing in good lighting. Use your fingernail or a screwdriver blade to probe any suspicious areas. If the metal gives way or flakes under light pressure, the rust has penetrated deeply. Note all affected areas so you can work systematically without missing spots.
Step 1: Clean the Surface Thoroughly
- Rinse the railing with water and a mild detergent to remove dirt, bird droppings, grease, and any organic material. Rust removers and primers bond poorly to contaminated surfaces.
- Use a soft brush or sponge for the initial wash. Avoid harsh abrasives at this stage since you are only removing surface contamination, not rust itself.
- Rinse with clean water and allow the railing to dry completely. Residual moisture will dilute chemical rust removers and slow their effectiveness.
- Apply mineral spirits or acetone on a clean rag to wipe away any oily or greasy residue. Let the solvent evaporate fully before proceeding.
Step 2: Mechanically Remove Loose and Flaking Rust
- Begin with a stiff wire brush on smaller or lightly rusted areas, working in the direction of the metal grain where visible. Use firm, short strokes and overlap your passes to ensure full coverage.
- For larger sections with moderate to heavy rust, switch to an angle grinder with a wire wheel or flap disc. Keep the tool moving at all times to avoid grinding too deeply into one spot, which can thin the metal wall unnecessarily.
- Use a dental pick or pointed screwdriver to clear rust from recessed areas such as weld seams, bolt holes, decorative grooves, and the interior of hollow tube sections if accessible.
- After mechanical abrasion, brush or blow away all loose rust particles and metal dust with compressed air or a clean dry brush.
- Inspect the surface carefully. All visibly reddish, flaky, or powdery material must be gone before chemical treatment. Any remaining loose rust will prevent the chemical from reaching clean metal.
Step 3: Apply Chemical Rust Remover or Converter
- Choose your chemical product based on the metal type and rust severity. Phosphoric acid-based converters are the most universally effective. They react with iron oxide to form a stable, dark iron phosphate layer that actually bonds to the metal and provides a primer-like foundation.
- Apply the product generously according to the manufacturer's directions, using a brush, sponge, or spray applicator. For vertical sections, use a thicker gel product such as naval jelly to prevent dripping and ensure adequate dwell time.
- Allow the product to work for the full recommended dwell time, typically 15 to 30 minutes for light rust and up to two hours for deeper corrosion. Do not let the product dry out completely during this period. If it starts to dry in hot weather, mist lightly with water to keep it active.
- Watch for the color change that indicates the chemical reaction is occurring. Phosphoric acid converters typically cause the rust to darken from reddish-orange to a dark gray or black, signaling that iron oxide is converting to iron phosphate.
- For extremely deep rust pitting, you may need a second application after the first has dried. Sand lightly between applications to expose fresh metal in the deepest cavities and reapply the converter.
Step 4: Rinse, Neutralize, and Dry
- If using a rust remover (which must be rinsed off rather than left as a primer): rinse thoroughly with clean water, ensuring all chemical residue is removed, particularly from crevices and recessed joints.
- If using a rust converter designed to be left in place: skip rinsing and allow the converted coating to cure according to the manufacturer's timeline, usually two to eight hours.
- Dry the metal as quickly as possible after rinsing. Use clean towels to hand-dry accessible surfaces, then use a heat gun or allow natural drying in sunlight. Do not proceed to priming or sealing until the metal is completely dry to the touch.
Step 5: Sand and Smooth the Surface
- Sand the treated areas with 80 to 120 grit sandpaper to remove any remaining roughness, chemical residue, or unevenness from the rust removal process.
- Progress to finer 180 to 320 grit sandpaper to create a smooth surface that provides excellent mechanical adhesion for primer and topcoat.
- Wipe the sanded surface with a tack cloth or a rag dampened with mineral spirits to remove all sanding dust. Any dust left on the surface will appear as texture through the finish coat.
Step 6: Apply Rust-Inhibiting Primer
- Apply a rust-inhibiting metal primer rated for exterior use within one to two hours of completing surface preparation. Do not leave bare metal exposed overnight, as flash rusting can occur rapidly in humid conditions.
- Apply two thin coats rather than one thick coat. Thin coats cure more evenly, adhere better, and are less likely to run or sag on vertical surfaces.
- Allow full cure time between coats as specified by the primer manufacturer. Rushing this step compromises the adhesion of the topcoat.
Step 7: Apply Topcoat and Finish
- Once the primer has fully cured, apply your chosen topcoat: exterior metal paint, powder coating touch-up, or a clear sealant for naturally attractive metals.
- Apply in thin, even passes. On tubular railings, work around the circumference of each section to ensure complete coverage, paying special attention to the underside where moisture tends to collect and corrosion begins first.
- Allow the topcoat to cure completely before the railing returns to normal use. Most exterior metal paints require 24 to 48 hours of dry time and up to a week for full hardness.
How Does Rust Removal Differ Between Stainless Steel Railing and Aluminum Railing?
One of the most important distinctions in metal railing maintenance is understanding that different alloys require fundamentally different approaches. What works perfectly on mild carbon steel can damage stainless steel railing or be completely ineffective on aluminum railing. At Vionta Metal, our engineers specify the surface treatment protocol based on the exact alloy grade, because using the wrong product or technique can actually accelerate corrosion rather than halt it.
Why Does Stainless Steel Railing Rust in the First Place?
Many people are surprised to discover that stainless steel railing can rust at all. Stainless steel owes its corrosion resistance to a thin, invisible layer of chromium oxide that forms on the surface when the metal is exposed to oxygen. This passive layer is self-repairing under normal conditions. However, it can be compromised by mechanical damage such as deep scratching, by contamination with iron particles from carbon steel tools or nearby steel structures, or by exposure to chloride-rich environments such as swimming pool surroundings or seaside locations. When the passive layer is breached, the underlying iron content in the alloy is exposed and rust, known in this context as tea staining or pitting corrosion, begins to develop.
How to Remove Rust from Stainless Steel Railing
- Never use carbon steel wire brushes on stainless steel railing. Carbon steel bristles shed microscopic iron particles that embed in the stainless surface and themselves rust, creating new corrosion spots. Always use stainless steel wire brushes or nylon abrasive pads for mechanical cleaning.
- Avoid chloride-based cleaners, bleach, or any product containing sodium hypochlorite on stainless steel. Chloride ions attack the passive chromium oxide layer aggressively and promote pitting corrosion.
- For surface rust or tea staining on stainless steel railing, apply a dedicated stainless steel cleaner or an oxalic acid solution. Allow it to dwell for the recommended period, then scrub gently with a non-scratch abrasive pad in the direction of the surface grain.
- After cleaning, rinse thoroughly with clean, low-chloride water and dry completely. Hard water can leave mineral deposits on polished stainless steel, so distilled or deionized water is preferable for the final rinse.
- Restore the passive layer by applying a passivation solution or a dedicated stainless steel polish containing a mild acid such as citric acid. This chemically reforms the protective chromium oxide layer and restores the original bright appearance.
- Finish with a stainless steel wax or protective oil, particularly in coastal applications, to create an additional moisture barrier that slows the accumulation of environmental contaminants.
How to Remove Rust and Oxidation from Aluminum Railing
Technically, aluminum does not rust in the traditional iron-oxide sense because aluminum contains no iron. However, aluminum railing does oxidize, forming a dull white or gray aluminum oxide layer that, in advanced cases, can cause pitting, chalking, and surface degradation that resembles rust in appearance and severity. Our team at Vionta Metal frequently receives inquiries from clients who describe their aluminum railing as rusting when the actual culprit is aluminum oxidation or galvanic corrosion from contact with a dissimilar metal.
- Remove oxidation from aluminum railing using an aluminum-specific cleaner or a mild acid solution such as diluted white vinegar. Avoid strong acids or alkalis as they attack aluminum aggressively.
- Use nylon scrubbing pads or very fine steel wool (0000 grade) for light polishing. Coarser abrasives will scratch the aluminum surface and make it more susceptible to future oxidation.
- Rinse thoroughly after chemical treatment, as aluminum is sensitive to both acid and alkaline residue left on the surface.
- Re-anodize or re-powder coat aluminum railing sections where the original protective coating has been physically damaged, since the aluminum substrate is most vulnerable in those exposed areas.
- Apply a wax sealant or aluminum protectant after cleaning to slow future oxidation and maintain the railing's appearance between maintenance cycles.
| Characteristic | Stainless Steel Railing | Aluminum Railing | Mild Carbon Steel Railing |
| Corrosion Type | Pitting, tea staining | White oxidation, chalking | Red iron oxide rust |
| Recommended Cleaner | Oxalic acid, stainless steel cleaner | Aluminum cleaner, dilute vinegar | Phosphoric acid, naval jelly |
| Safe Abrasives | SS wire brush, nylon pad | Nylon pad, 0000 steel wool | Carbon steel wire brush, flap disc |
| Avoid | Chloride cleaners, carbon steel tools | Strong acids, alkalis, bleach | Leaving bare metal exposed after removal |
| Post-Treatment | Passivation, stainless wax | Wax sealant, anodize repair | Rust primer plus topcoat paint |
| Corrosion Resistance Level | High (Grade 316 best for coastal) | Moderate to high (anodized) | Low (requires ongoing protection) |
| Maintenance Frequency | Annual inspection and cleaning | Annual cleaning, bi-annual waxing | Bi-annual inspection, touch-up as needed |
What Are the Best Rust Removal Products and When Should You Use Each?
The market for rust removal products is large and sometimes confusing. There are rust removers, rust converters, rust inhibitors, rust encapsulators, and multi-function products that claim to do everything. Understanding the distinction between these categories helps you choose the right product for the right situation and avoid wasting money on a product that does not match your railing type or rust stage.
Rust Removers vs. Rust Converters: What Is the Difference?
A rust remover dissolves iron oxide chemically, lifting it off the metal surface. You apply it, allow it to work, and then rinse or wipe it away, taking the rust with it. These are best for situations where you want a completely clean metal surface before priming or polishing, particularly on visible, high-gloss sections such as polished stainless steel railing or anodized aluminum railing.
A rust converter, by contrast, does not remove rust. Instead, it reacts chemically with the iron oxide and converts it into a stable compound, typically iron phosphate or iron tannate, that is inert and actually bonds to the metal as a dark primer-like layer. Rust converters are ideal for areas where achieving a completely clean surface is impractical, such as deep pitting, recessed weld seams, or the interior surfaces of hollow tube sections where abrasive tools cannot reach.
Top Rust Removal Product Categories and Best Use Cases
- Phosphoric Acid Rust Converters: The most widely recommended category for general metal railing maintenance. Effective on all steel types and iron. Available in liquid, gel, and aerosol spray. Converts active rust to a black iron phosphate primer layer. Best used after mechanical removal of loose rust to treat residual oxidation in pits and seams.
- Oxalic Acid Solutions: The preferred choice for stainless steel railing because oxalic acid removes rust staining and iron contamination without attacking the chromium passive layer. Particularly effective for tea staining on brushed or polished stainless surfaces. Must be rinsed thoroughly after application.
- Citric Acid Treatments: A gentler, more environmentally friendly alternative to stronger acids. Effective for light surface rust and early-stage oxidation on aluminum railing and stainless steel. Biodegradable and safer for use near landscaping and water features. Slower acting but excellent for delicate or decorative railing details.
- Naval Jelly (Phosphoric Acid Gel): A thickened gel form of phosphoric acid that clings to vertical and overhead surfaces without dripping. Ideal for railings where you cannot apply a liquid without making a mess. Apply thickly, wait 30 minutes or more, then rinse off. Works on most painted and bare steel railings.
- Rust Encapsulators: Specialty primers that seal over rust that cannot be fully removed. These penetrating products lock in residual rust, preventing moisture from reaching it and halting further corrosion. Best reserved for areas where sandblasting or thorough mechanical removal is not practical and where cosmetic perfection is not required.
- White Vinegar (Acetic Acid): A household remedy that genuinely works on light surface rust via acetic acid, though it is significantly slower and less effective than commercial products for anything beyond the lightest oxidation. Suitable for small spot treatments and for environmentally sensitive situations where acid products are restricted.
| Product Type | Active Ingredient | Best For | Application Method | Dwell Time | Rinse Required |
| Phosphoric Acid Converter | Phosphoric acid | General steel, moderate rust | Brush, spray, sponge | 15 to 60 min | Depends on product |
| Oxalic Acid Solution | Oxalic acid | Stainless steel railing, tea staining | Sponge, spray | 10 to 30 min | Yes, thoroughly |
| Citric Acid Treatment | Citric acid | Light rust, eco-sensitive areas | Spray, sponge, soak | 30 to 120 min | Yes |
| Naval Jelly | Phosphoric acid gel | Vertical, overhead, curved surfaces | Brush on thick | 15 to 30 min | Yes |
| Rust Encapsulator | Polymeric binders | Inaccessible areas, heavy pitting | Brush, spray | No dwell, cure time applies | No |
| White Vinegar | Acetic acid (5%) | Very light rust, small areas | Cloth, spray, soak | 1 to 6 hours | Yes |
How Do You Prevent Rust from Coming Back After Treatment?
Rust removal without a robust prevention strategy is simply an exercise in repetition. Every effort you make to clean, treat, and refinish a railing will need to be repeated far sooner than necessary if you do not address the underlying environmental and maintenance factors that allowed rust to develop in the first place. Our experience at Vionta Metal shows that clients who implement a structured prevention program after our initial treatment extend the service life of their railings by four to six times compared to those who treat rust reactively without any follow-up program.
The Most Effective Rust Prevention Strategies
- Annual inspection and cleaning regime: Walk every linear foot of your railing system at least once per year, ideally in spring after winter weather, and again in autumn before cold and wet conditions set in. Use this inspection to identify early-stage rust, coating failures, mechanical damage, and any areas where water is collecting or draining poorly.
- Immediate touch-up of coating damage: Every scratch, chip, or area of peeling paint is an open invitation for rust to begin. Keep a small supply of matching primer and topcoat paint on hand and address any damage as soon as you notice it, ideally within the same week. Do not wait for an annual maintenance cycle if you see a problem.
- Maintaining proper drainage at post bases: Most railing corrosion begins at the base of posts where water collects and evaporates slowly. Ensure that post bases are properly sealed with exterior-grade waterproof caulk or silicone and that any core-drilled holes or concrete penetrations are fully sealed around the post to exclude moisture.
- Applying wax or sealant to stainless steel railing annually: A good quality paste wax or dedicated stainless steel protectant applied to our factory-finished stainless railing products creates a hydrophobic surface that causes water to bead and run off rather than sitting and slowly compromising the passive layer. This is particularly important in coastal environments.
- Avoiding galvanic corrosion by using compatible fasteners and fittings: When attaching railings to structures or fitting accessories, always use fasteners and brackets made from the same metal or from a compatible alloy. Mixing stainless steel railing with carbon steel bolts, for example, creates a galvanic cell that will corrode the weaker metal rapidly. Our factory supplies all-stainless or all-aluminum hardware sets matched precisely to each railing system.
- Washing railings in coastal environments every two months: Salt deposits from sea spray are the single most aggressive corrosion trigger in coastal areas. A simple wash with fresh water and a mild detergent every eight weeks removes accumulated salt before it can breach protective coatings and attack the underlying metal.
- Choosing the right alloy for your environment from the start: The most effective rust prevention is selecting a railing material that is inherently suited to your specific environmental conditions. Grade 316 stainless steel railing, for example, contains molybdenum that provides dramatically superior chloride resistance compared to 304 grade, making it the correct specification for marine and pool applications. Our factory engineering team can advise on the optimal alloy, finish, and coating system for any installation environment.
Important: Never apply silicone-based lubricants to areas where you intend to paint or prime. Silicone contamination causes paint fisheye and adhesion failure, which will allow moisture under the coating and accelerate rust. Always use mineral spirits to thoroughly clean any area to be painted, particularly in workshops or properties where silicone products are used regularly.
| Prevention Method | Frequency | Applicable Railing Types | Estimated Annual Cost (USD) | Effectiveness Rating |
| Annual inspection and cleaning | Once or twice per year | All metal types | 20 to 80 (DIY supplies) | Very High |
| Immediate chip and scratch touch-up | As needed | Painted or coated railings | 15 to 50 per incident | Very High |
| Post base sealing and caulking | Every two to three years | All embedded or surface-mounted posts | 10 to 40 per section | High |
| Wax or protective sealant application | Once or twice per year | Stainless steel railing, polished aluminum railing | 15 to 45 per product | High |
| Bi-monthly fresh water wash (coastal) | Every six to eight weeks | All railings within 1 km of coastline | Negligible | Very High |
| Compatible hardware and fasteners | At installation (one-time) | All railings with mixed material junctions | Included in proper specification | Very High |
What Does Vionta Metal Recommend for Long-Term Railing Maintenance?
At Vionta Metal, our philosophy is that every railing we manufacture and supply should remain structurally sound and visually excellent for the entire lifespan of the building or structure it serves. We back this with factory-level material specifications, precision fabrication standards, and a comprehensive maintenance guidance program for all our clients. The recommendations below represent the distilled wisdom of our engineering and quality control teams, developed over years of working with stainless steel railing systems and aluminum railing installations across a wide range of climates and use cases.
Vionta Metal Product Specifications for Corrosion-Resistant Railings
Understanding the specifications of the railing products you are maintaining helps you apply the right treatment and set realistic expectations for performance and longevity. Below are the core product parameters for our primary stainless steel railing and aluminum railing ranges.
| Parameter | Stainless Steel Railing (Grade 316) | Stainless Steel Railing (Grade 304) | Aluminum Railing (6063-T5) |
| Primary Alloy Composition | Fe, Cr 16-18%, Ni 10-14%, Mo 2-3% | Fe, Cr 18-20%, Ni 8-10.5% | Al 98%+, Mg 0.45-0.9%, Si 0.2-0.6% |
| Tensile Strength | 515 MPa minimum | 515 MPa minimum | 205 MPa minimum |
| Yield Strength | 205 MPa minimum | 205 MPa minimum | 170 MPa minimum |
| Hardness (Brinell) | 217 HB max | 217 HB max | 60 to 75 HB |
| Surface Finish Options | No.4 Brushed, Mirror (#8), 2B, Electro-polished | No.4 Brushed, Mirror (#8), 2B | Anodized (Clear, Bronze, Black), Powder Coated (RAL range) |
| Wall Thickness (Standard Tube) | 1.2 mm, 1.5 mm, 2.0 mm, 3.0 mm | 1.2 mm, 1.5 mm, 2.0 mm | 1.5 mm, 2.0 mm, 2.5 mm, 3.0 mm |
| Outer Diameter Range | 25 mm to 114 mm | 25 mm to 101.6 mm | 25 mm to 101.6 mm |
| Corrosion Resistance Environment | Marine, pool, industrial, coastal | Urban, suburban, light industrial | Urban, coastal (anodized), architectural |
| Operating Temperature Range | Minus 200 deg C to plus 870 deg C | Minus 196 deg C to plus 800 deg C | Minus 50 deg C to plus 200 deg C |
| Compliance and Certification | ASTM A554, AISI 316, EN 10088 | ASTM A554, AISI 304, EN 10088 | ASTM B221, EN 755-2, AA 6063 |
| Welding Compatibility | TIG, MIG with 316L filler | TIG, MIG with 308L filler | TIG with 4043 or 5356 filler |
| Expected Service Life (Maintained) | 30 to 50 years or more | 20 to 35 years | 25 to 40 years (anodized) |
Recommended Annual Maintenance Schedule from Vionta Metal
- January to February (Winter Inspection): Check all post bases and ground-level connections for ice damage, frost heave, and moisture ingress. Tighten any loose hardware since thermal cycling can cause fasteners to work loose over winter.
- March to April (Spring Clean and Treat): Perform a thorough wash of the entire railing system after winter. Inspect for any rust spots, coating damage, or corrosion that developed during the cold and wet season. Treat and touch up any identified areas immediately.
- May to June (Wax and Seal): Apply paste wax or protective sealant to stainless steel railing and polished aluminum railing sections. Re-caulk any post bases or transitions where sealant has cracked or shrunk during winter temperature fluctuations.
- July to August (Mid-Season Check): In coastal or industrial environments, perform a mid-year rinse and inspection. Salt accumulation and summer condensation cycles can accelerate corrosion during warm months even on high-grade alloys.
- September to October (Pre-Winter Preparation): Complete any painting, priming, or protective coating work before cold weather sets in, as most exterior coatings require temperatures above 10 degrees Celsius for proper application and curing. Ensure all drainage channels and drainage holes in hollow post sections are clear of debris.
- November to December (Documentation): Photograph the full railing installation and document any maintenance performed during the year. Maintaining a maintenance log is invaluable for warranty claims, insurance documentation, and planning future maintenance budgets.
Why Professional Railing Material Specification Matters More Than Maintenance Alone
The single most important factor in avoiding rust and corrosion problems is selecting the correct material and specification at the outset of a project. No amount of diligent maintenance can fully compensate for using Grade 304 stainless steel railing in a marine environment when Grade 316 is required, or for specifying a powder coating thickness that is below the minimum recommended for an industrial application.
Our factory engineering team at Vionta Metal works directly with architects, specifiers, and contractors during the design stage to ensure that every railing system is matched to its environment. Our consultative process considers local salt load, UV exposure, chemical exposure, pedestrian traffic intensity, and the expected maintenance capability of the end client. The result is a railing specification that delivers years of trouble-free performance with a straightforward maintenance program that does not require specialist contractors or expensive materials.
Whether you are specifying a stainless steel railing for a luxury waterfront development or an aluminum railing for a commercial office campus, our team can provide material certifications, finish samples, and installation guidance that take the guesswork out of long-term corrosion management.
Conclusion: Take Action Before Rust Takes Over
Key Takeaways
- Rust develops from the interaction of iron, oxygen, and moisture, and it progresses from surface staining to structural damage if left untreated.
- The correct rust removal process follows a clear sequence: clean, mechanically abrade, chemically treat, dry, prime, and topcoat.
- Stainless steel railing and aluminum railing require different cleaning products and abrasive tools compared to carbon steel. Using the wrong approach can worsen corrosion rather than fix it.
- Rust converters are ideal for inaccessible or deeply pitted areas, while rust removers deliver cleaner results on visible, high-finish surfaces.
- Prevention is significantly more cost-effective than reactive repair. An annual inspection and cleaning program extends railing service life by four to six times.
- Material specification is the most critical factor in long-term corrosion resistance. Matching alloy grade, surface finish, and protective coating to the installation environment is the foundation of a maintenance-friendly railing system.
Rust does not have to be the end of your railing investment. With the knowledge in this guide, you are equipped to assess the severity of any rust problem accurately, choose the right tools and products, execute a complete rust removal and prevention treatment, and set up a maintenance program that keeps your railings looking and performing like new for decades. The most important rule of all is simply to act early. Every week you wait, rust goes deeper.
Ready for a Railing That Truly Resists Rust?
If your current railing is showing signs of corrosion or you are planning a new installation and want to get the material specification right the first time, our team at Vionta Metal is here to help.
We manufacture precision-grade stainless steel railing and aluminum railing systems built to perform in the most demanding environments. Our factory offers custom specifications, certified materials, professional surface finishes, and full technical support from design through installation.
Contact Vionta Metal today to request a free product consultation, material sample, or project quotation. Our engineering team responds within 24 hours and can provide detailed recommendations tailored to your specific climate, application, and budget.
Do not let rust undermine a valuable investment. Partner with Vionta Metal and build with confidence from day one.
Get a Free Consultation from Vionta MetalNext :
-
Related News
- What Are the Different Types of Outdoor Privacy Screens?
- Vinyl Ranch Fence Installation: A Practical Guide for Long-Lasting Results
- How Do Motorized Awnings Contribute to Energy Efficiency?
- What is the Best Cable Railing for a Deck?
- How Tall Should Deck Railing Be?
- What are the benefits of using a fence privacy screen?
Leave me a message


